공부 내용을 정리하고 앞으로의 학습에 이해를 돕기 위해 작성합니다.


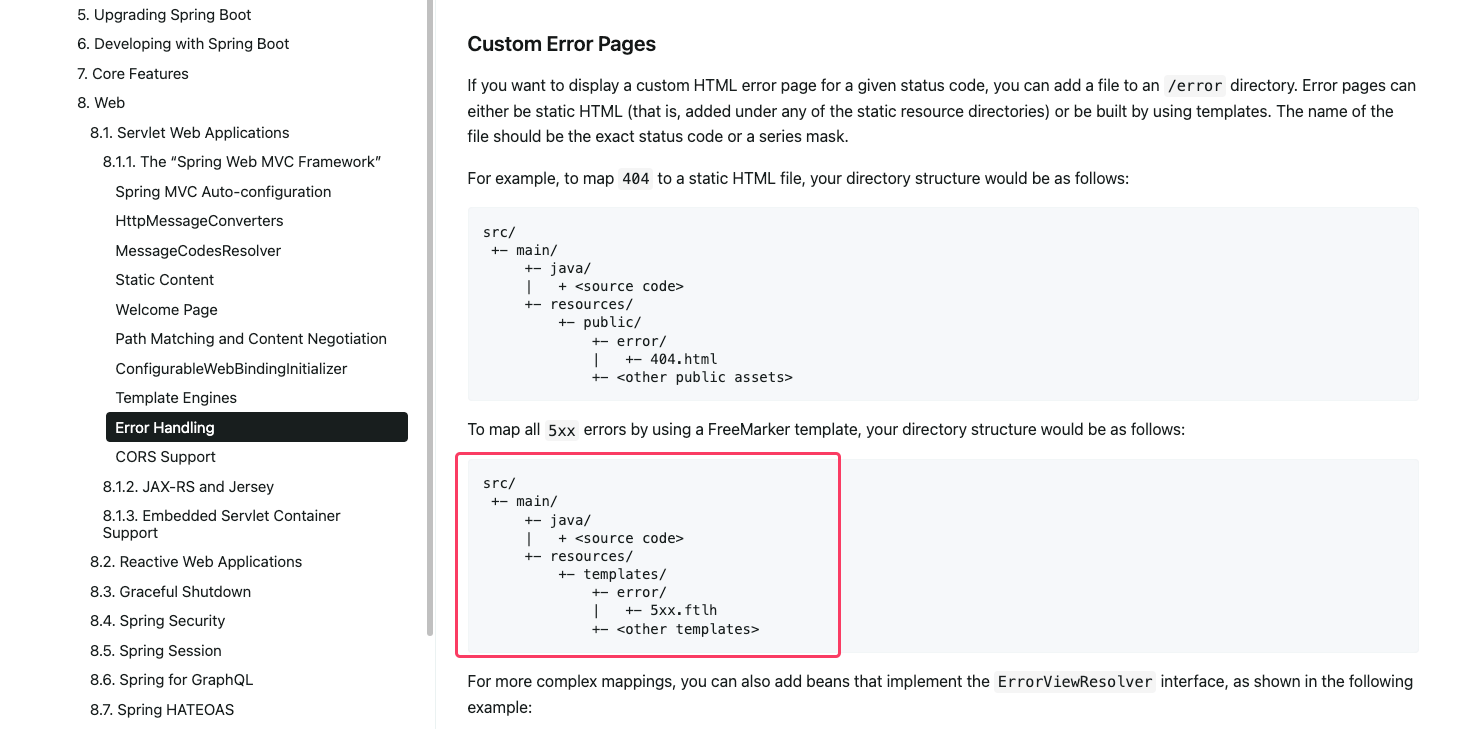
이번 포스팅에서는 잘못된 URL로 접속했을 때 보여주는 에러 페이지를 어떻게 구현했는지 다룬다.
에러 페이지는 Spring Boot의 공식 문서와 AdminLTE의 디자인을 참조하여 구성하였다.


에러 페이지를 적용하지 않았을 때, 아래 스크린샷에서 보이는 것처럼 기본적으로 Spring Boot에서 제공하는 "Whitelabel Error Page"가 표시된다. 이 페이지는 특별한 설정을 하지 않았을 때 Spring Boot에서 기본적으로 제공하는 오류 처리 페이지로, 오류가 발생한 이유와 스택 트레이스 정보를 보여준다.

1. 전역 컨트롤러 설정
우선, 모든 컨트롤러에 공통으로 사용할 전역 설정을 추가한다. GlobalControllerAdvice를 통해, 요청된 URI와 상태 코드를 모든 템플릿에서 접근할 수 있도록 한다.
package org.example.projectboardadmin.controller;

import jakarta.servlet.http.HttpServletRequest;
import jakarta.servlet.http.HttpServletResponse;
import org.springframework.web.bind.annotation.ControllerAdvice;
import org.springframework.web.bind.annotation.ModelAttribute;

@ControllerAdvice
public class GlobalControllerAdvice {

    @ModelAttribute("requestURI")
    public String requestURI(HttpServletRequest request) {
        return request.getRequestURI();
    }

    @ModelAttribute("statusCode")
    public int statusCode(HttpServletResponse response) {
        return response.getStatus();
    }
}
왜 전역 컨트롤러 설정을 사용하는가?
이전에는 각 컨트롤러마다 Model에 공통적으로 필요한 데이터를 설정해야 했다. 예를 들어, 다음과 같은 코드를 모든 컨트롤러에 추가해야 했었다.
@GetMapping
public String somePage(Model model, HttpServletRequest request) {
    model.addAttribute("requestURI", request.getRequestURI());
    model.addAttribute("statusCode", response.getStatus());
    return "some-page";
}- 이처럼 중복된 코드는 유지보수와 확장에 있어서 비효율적이다.
- 이를 전역 컨트롤러에서 한번에 처리하면, 각 컨트롤러마다 중복된 코드를 작성할 필요가 없어진다.
기존 코드 ${#response.status}가 지원되지 않는 이유 & 해결방법
원래는 4xx.html에서 <attr sel="#error-status" th:text="${#response.status}" /> 코드를 사용해 HTTP 상태 코드를 표시했다. 하지만 Thymeleaf 3.x 버전 이후부터 ${#response.status}와 같은 일부 Spring Expression Language(SpEL) 표현식이 더 이상 기본적으로 지원되지 않는다. 이에 따라 Spring과 Thymeleaf의 분리로 인해, #response 객체를 통해 상태 코드에 직접 접근하는 기능이 제거된 것이다. 이러한 변화는 Thymeleaf와 Spring이 분리되어 독립적인 템플릿 엔진으로 발전하면서 발생했다.
이로 인해 HTTP 상태 코드를 템플릿에서 쉽게 접근하기 어려워졌지만, 이를 해결하기 위해 전역 컨트롤러에서 statusCode를 선언하고 모델에 추가해 모든 뷰에서 접근할 수 있게 했다.
@ModelAttribute("statusCode")
public int statusCode(HttpServletResponse response) {
    return response.getStatus();
}- 이 설정을 통해 더 이상 ${#response.status}를 사용할 필요가 없으며, 대신 ${statusCode}로 접근할 수 있다.
2. 기존 컨트롤러 코드 간소화
전역 컨트롤러 설정 이후, 각 컨트롤러에서 중복된 requestURI와 statusCode 설정을 제거하고, 템플릿 내에서 자연스럽게 사용할 수 있다. 이제 각 컨트롤러는 핵심 로직에만 집중할 수 있게 되어 코드의 간결성과 유지보수성이 향상되었다.
3. 에러 페이지 레이아웃 구성
AdminLTE의 디자인을 활용해 4XX와 5XX 에러 페이지를 구성하였다. 디커플드(Decoupled) 로직을 사용하여 HTML 파일과 타임리프(Thymeleaf) 파일을 분리해 작성하였다.
4xx.html
<!DOCTYPE html>
<html lang="ko">
<head id="layout-head">
    <meta charset="UTF-8">
    <title>4XX 에러</title>
</head>
<body class="hold-transition sidebar-mini">
<div class="wrapper">
    <header id="layout-header">헤더 삽입부</header>
    <aside id="layout-left-aside">왼쪽 사이드 바 삽입부</aside>

    <main class="content-wrapper">
        <!-- Content Header (Page header) -->
        <section class="content-header">
            <div class="container-fluid">
                <div class="row mb-2">
                    <div class="col-sm-6">
                        <h1 id="main-header-title" class="m-0">Error Page</h1>
                    </div>
                    <div class="col-sm-6">
                        <ol class="breadcrumb float-sm-right">
                            <li class="breadcrumb-item"><a id="breadcrumb-home">Home</a></li>
                            <li id="breadcrumb-current-page" class="breadcrumb-item active지">Error Page</li>
                        </ol>
                    </div>
                </div>
            </div><!-- /.container-fluid -->
        </section>

        <!-- Main content -->
        <section class="content">
            <div class="error-page">
                <h2 id="error-status" class="headline text-warning">4XX</h2>

                <div class="error-content">
                    <h3><i class="fas fa-exclamation-triangle text-warning"></i> Oops!</h3>

                    <p>
                        <span id="error-message">Something went wrong.</span>
                    </p>
                </div>
                <!-- /.error-content -->
            </div>
            <!-- /.error-page -->
        </section>
        <!-- /.content -->
    </main>
    <!-- /.content-wrapper -->

    <aside id="layout-right-aside">오른쪽 사이드 바 삽입부</aside>
    <footer id="layout-footer">푸터 삽입부</footer>
</div>
<!-- ./wrapper -->

<!--/* REQUIRED SCRIPTS */-->
<script id="layout-scripts">/* 공통 스크립트 삽입부 */</script>

<!--/* 페이지 전용 스크립트 */-->
</body>
</html>
4xx.th.xml
<?xml version="1.0"?>
<thlogic>
    <attr sel="#layout-head" th:replace="~{layouts/layout-head :: common_head(~{::title}, (~{::link} ?: ~{}))}" />
    <attr sel="#layout-header" th:replace="~{layouts/layout-header :: header}" />
    <attr sel="#layout-left-aside" th:replace="~{layouts/layout-left-aside :: aside}" />
    <attr sel="#layout-right-aside" th:replace="~{layouts/layout-right-aside :: aside}" />
    <attr sel="#layout-footer" th:replace="~{layouts/layout-footer :: footer}" />
    <attr sel="#layout-scripts" th:replace="~{layouts/layout-scripts :: script}" />

    <attr sel="#main-header-title" th:text="'에러 페이지'" />
    <attr sel="#breadcrumb-home" th:href="@{/}" th:text="'홈'" />
    <attr sel="#breadcrumb-current-page" th:text="'에러 페이지'" />
    <attr sel="#error-status" th:text="${statusCode}" />
    <attr sel="#error-message" th:text="'잘못된 호출입니다.'" />
</thlogic>
5xx.html
<!DOCTYPE html>
<html lang="ko">
<head id="layout-head">
    <meta charset="UTF-8">
    <title>5XX 에러</title>
</head>
<body class="hold-transition sidebar-mini">
<div class="wrapper">
    <header id="layout-header">헤더 삽입부</header>
    <aside id="layout-left-aside">왼쪽 사이드 바 삽입부</aside>

    <main class="content-wrapper">
        <!-- Content Header (Page header) -->
        <section class="content-header">
            <div class="container-fluid">
                <div class="row mb-2">
                    <div class="col-sm-6">
                        <h1 id="main-header-title" class="m-0">Error Page</h1>
                    </div>
                    <div class="col-sm-6">
                        <ol class="breadcrumb float-sm-right">
                            <li class="breadcrumb-item"><a id="breadcrumb-home">Home</a></li>
                            <li id="breadcrumb-current-page" class="breadcrumb-item active지">Error Page</li>
                        </ol>
                    </div>
                </div>
            </div><!-- /.container-fluid -->
        </section>

        <!-- Main content -->
        <section class="content">
            <div class="error-page">
                <h2 id="error-status" class="headline text-danger">5XX</h2>

                <div class="error-content">
                    <h3><i class="fas fa-exclamation-triangle text-danger"></i> Oops!</h3>

                    <p>
                        <span id="error-message">Something went wrong.</span>
                    </p>
                </div>
                <!-- /.error-content -->
            </div>
            <!-- /.error-page -->
        </section>
        <!-- /.content -->
    </main>
    <!-- /.content-wrapper -->

    <aside id="layout-right-aside">오른쪽 사이드 바 삽입부</aside>
    <footer id="layout-footer">푸터 삽입부</footer>
</div>
<!-- ./wrapper -->

<!--/* REQUIRED SCRIPTS */-->
<script id="layout-scripts">/* 공통 스크립트 삽입부 */</script>

<!--/* 페이지 전용 스크립트 */-->
</body>
</html>
5xx.th.xml
<?xml version="1.0"?>
<thlogic>
    <attr sel="#layout-head" th:replace="~{layouts/layout-head :: common_head(~{::title}, (~{::link} ?: ~{}))}" />
    <attr sel="#layout-header" th:replace="~{layouts/layout-header :: header}" />
    <attr sel="#layout-left-aside" th:replace="~{layouts/layout-left-aside :: aside}" />
    <attr sel="#layout-right-aside" th:replace="~{layouts/layout-right-aside :: aside}" />
    <attr sel="#layout-footer" th:replace="~{layouts/layout-footer :: footer}" />
    <attr sel="#layout-scripts" th:replace="~{layouts/layout-scripts :: script}" />

    <attr sel="#main-header-title" th:text="'에러 페이지'" />
    <attr sel="#breadcrumb-home" th:href="@{/}" th:text="'홈'" />
    <attr sel="#breadcrumb-current-page" th:text="'에러 페이지'" />
    <attr sel="#error-status" th:text="${statusCode}" />
    <attr sel="#error-message" th:text="'알 수 없는 에러가 발생했어요!'" />
</thlogic>
4. 최종 결과
이제 설정한 에러 페이지가 제대로 적용된다. 잘못된 URL로 접속했을 때, AdminLTE 스타일을 적용한 커스터마이즈 된 에러 페이지가 표시된다. 각 페이지는 4XX와 5XX 상황에 맞게 각각 다른 디자인과 메시지를 제공한다. 404와 같은 클라이언트 에러는 직접 URL을 잘못 입력해 테스트할 수 있었지만, 5XX 서버 에러는 실제 서버 에러를 발생시켜야 하기 때문에 확인하기는 어려웠다.
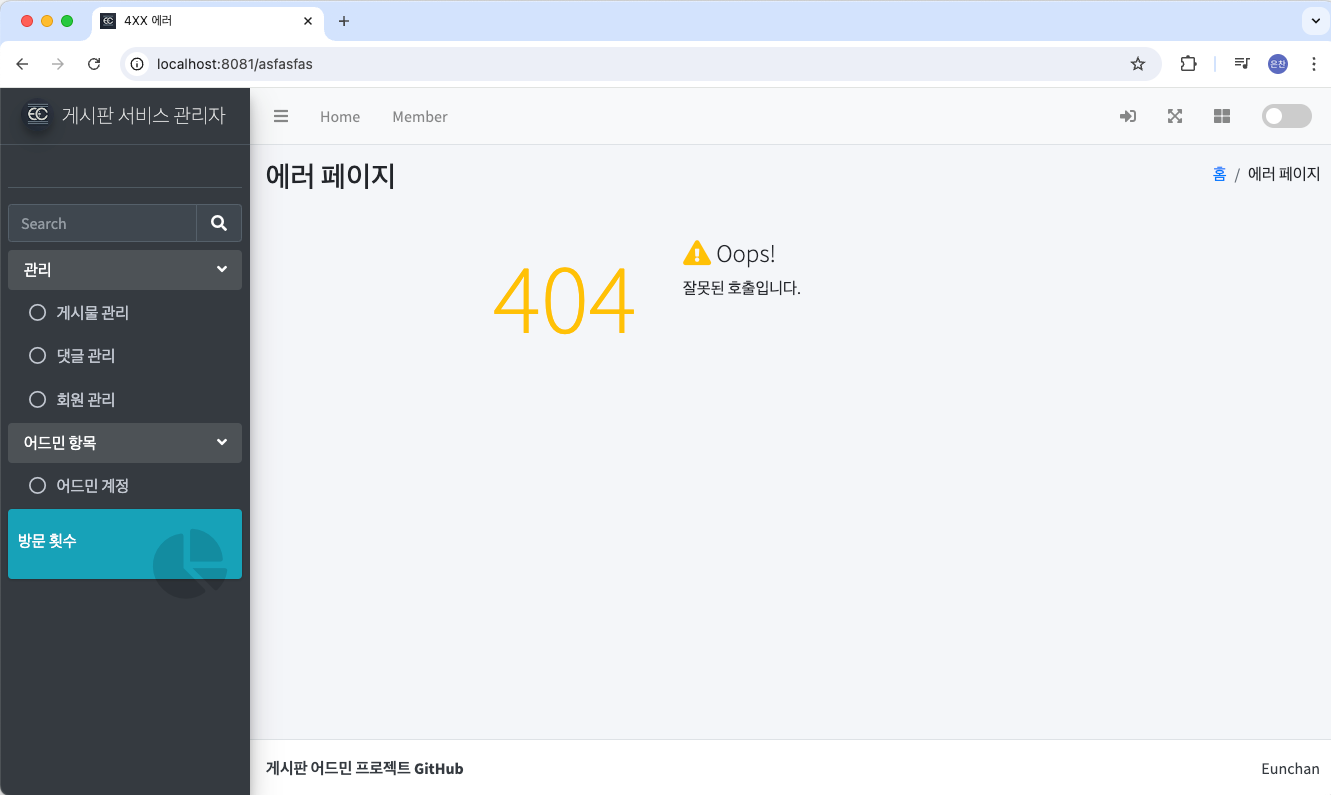
이렇게 커스터마이즈된 에러 페이지를 통해 사용자에게 더 나은 경험을 제공할 수 있게 되었다. 에러 상황에서도 사용자 친화적인 인터페이스로 웹사이트의 전반적인 품질을 향상시켰다. 다음 포스팅에서는 Admin 프로젝트의 게시글을 모달로 보는 기능 개발에 대해 다룰 예정이다. 이를 통해 관리자 인터페이스의 사용성과 효율성을 한층 더 개선할 수 있을 것으로 기대된다.
'BackEnd > Project' 카테고리의 다른 글
| [Admin] Ch03. 게시글 관리 페이지 구현(3) (0) | 2024.08.23 |
|---|---|
| [Admin] Ch03. 게시글 관리 페이지 구현(2) (0) | 2024.08.21 |
| [Admin] Ch03. 게시글 관리 페이지 구현(1) (0) | 2024.08.21 |
| [Admin] Ch03. 로그인 페이지 기능 테스트 정의 (0) | 2024.08.21 |
| [Admin] Ch03. 회원 관리 페이지 기능 테스트 정의(2) (0) | 2024.08.20 |


